Whether they’re seeking out “How to tie a tie” on YouTube, enjoying a serendipitous educational moment from “How Stuff Works” on Facebook, or following along with a subject matter expert’s process demonstration on the company’s video library, people love learning from video.
In fact, today most of us prefer to include video in our learning experiences — Forrester Research has reported that when they’re available, employees are 75 percent more likely to watch a video than to read documents, emails, or articles online.
And as a result, learning professionals from higher education to corporate training are now reimagining how they can deliver training — making more and more use of video not for the sake of being trendy but because of the many advantages video has for learning. From flipped classrooms to active learning, blended teaching methods that incorporate video have not only helped improve learning but also enabled instructors to scale the reach of their courses.
But for both teachers and trainers alike, perhaps one of the biggest challenges to developing video-based e-learning courses is not adjusting a curriculum or even scripting and storyboarding. It’s producing the videos themselves.
Up until recently, producing an e-learning video has typically meant tapping third-party partners or in-house AV professionals to handle the technical ins and outs of lighting, staging, audio, and video, as well as post-production editing — if you’re fortunate to have a budget for that. And that’s even before all the other headaches of logistics, scheduling, and more come in.
Fortunately, today there are easier options.
How To Create Engaging E-Learning Videos with Panopto
Advances in video equipment and technology has made recording e-learning videos that follow best practices for engaged learning incredibly easy, regardless of your technical prowess. And with Panopto’s industry-leading e-learning video software, you can record, edit, and share instructor-led video presentations, demonstrations, classroom lectures, role-play scenarios, and more in 5 easy steps.
1. Prepare your talking points and supporting teaching materials.
Recording e-learning videos requires much of the same preparation as you’d put into teaching in-person. For just about any presentation, you’ll want to outline your talking points and prepare any supporting media such as PowerPoint slides. If you’ll be including a demonstration, you’ll want to prepare a stage for the equipment and/or processes you’ll be walking through, or have your computer screen ready to show a digital version. And for scenario-based training, you’ll need to be sure your scripts, performers, and props are prepped and ready to go.
If you have time, it’s a good idea to record yourself or your performers practicing at least once to help make the flow of your delivery as smooth as possible.
2. Select audio and video sources for your e-learning video in Panopto.
With Panopto, you don’t need a lot of fancy (and expensive) AV equipment to get professional-quality results. With just a laptop, a mic, and a webcam, you can capture yourself presenting as well as slides or an on-screen demonstration. And you can easily connect additional webcams, computer screens, mobile devices, more in order to capture multi-camera recordings of more complex demonstrations or scenario performances.
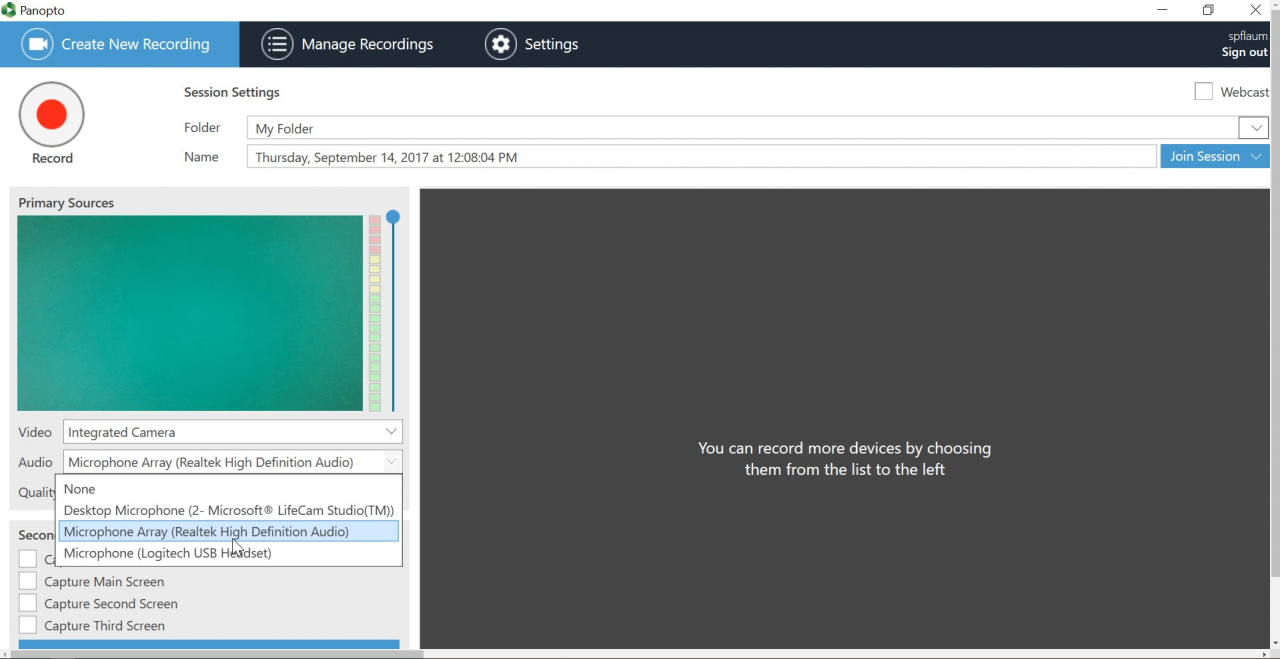
Panopto automatically detects all your video and audio inputs, so you can simply click to select the audio and video sources you want to use.
Select your audio and video devices from the drop-down menus in Panopto as shown below.
Related Reading: 7 Tips For Making Webcam Videos Look Good
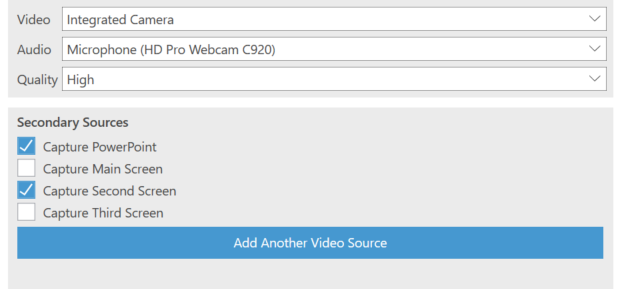
3. Open your slides and any software you plan to use for a demonstration.
If you’re sharing slides, open your presentation and click the box next to “Capture PowerPoint” from the options under “Secondary Sources.” Panopto automatically ingests your PowerPoint slides, which also makes it easy for learners to search the content within your e-learning videos later. If you also want to capture video of what you’re showing on your screen, or even multiple screens, you’ll simply click the boxes to record any screens you wish to present as shown below.
4. Start recording your e-learning video.
Once you’ve selected the media for your e-learning video, you’re ready to press “record” and start presenting. Pause your recording as needed and press stop when you’re done presenting. If you make a mistake, you can actually just keep recording. Take a deep breath to pause and begin again — you can edit out the sections of the video you don’t want after you’ve finished recording your video.

5. Edit your e-learning video.
Once you’ve finished recording, Panopto will automatically synchronize all the media feeds you’ve selected and upload it to the cloud for you to edit and share.
Panopto’s HTML5-based online video editor makes quick work of basic video editing tasks. Trim unwanted sections from your training video, splice in new video to update outdated materials, and even switch between video inputs if you recorded video with multiple cameras. Video editing in Panopto is non-destructive, which means you can always revert back to the original recording if you don’t like something.
You can also use the Panopto editor to create and add quizzes to your e-learning videos. Including quizzes can be a great way to keep your viewers engaged, as well as to help you see where your lesson was well understood and where your audience may still have some confusion.

When you’re all done, here’s what an e-learning video recorded in Panopto can look like:
The post 5 Easy Steps For Producing Better E-Learning Videos appeared first on Panopto Video Platform.